Mining isn’t just digging a hole. It is the process of extracting useful minerals from the Earth’s surface, including the seas. But here is the catch. A mineral is an inorganic substance with a definite chemical composition and distinctive physical properties. Coal is the exception, an organic substance often grouped in. Then there is ore. Ore is a metalliferous mineral, or an aggregate of such minerals and gangue (rock of no economic value), that can be mined at a profit.
Mineral deposit designates a natural occurrence of a useful mineral. Ore deposit denotes a mineral deposit of sufficient extent and concentration to invite exploitation. See the difference? It comes down to money.
Why price tags determine geological reality
When evaluating mineral deposits, it is extremely important to keep profit in mind. The total quantity of mineral in a given deposit is referred to as the mineral inventory. Only that quantity which can be mined at a profit is termed the ore reserve. As the selling price of the mineral rises or the extraction costs fall, the proportion of the mineral inventory classified as ore increases.
Obviously, the opposite is also true. A mine may cease production because the mineral is exhausted. Or because prices have dropped or costs risen so much that what was once ore is now only mineral. It is a shifting definition. The ground doesn’t change. The math does.
The deep roots of extraction
Archaeological discoveries indicate that mining was conducted in prehistoric times. The first mineral used was flint. Its conchoidal fracturing pattern allowed it to be broken into sharp-edged pieces. Useful as scrapers, knives, and arrowheads. During the Neolithic Period (about 8000–2000 bce), shafts up to 100 metres (330 feet) deep were sunk in soft chalk deposits in France and Britain. They wanted the flint pebbles. Red ochre and the copper mineral malachite served as pigments.
The oldest known underground mine in the world was sunk more than 40,000 years ago. Located at Bomvu Ridge in the Ngwenya mountains, Swaziland. They mined ochre for burial ceremonies and body colouring. Gold was one of the first metals utilized. Mined from streambeds of sand and gravel where it occurred as a pure metal due to chemical stability. Copper, chemically less stable, occurs in native form and was probably the second metal discovered. Silver was also found in a pure state. At one time, it was valued more highly than gold.
Ancient smelting and monumental stone
Historians say Egyptians were mining copper on the Sinai Peninsula as long ago as 3000 bce. Some bronze (copper alloyed with tin) is dated as early as 3700 bce. Iron is dated as early as 2800 bce. Egyptian records of iron ore smelting date from 1300 bce. Lead, found in the ancient ruins of Troy, was produced as early as 2500 bce.
One of the earliest evidences of building with quarried stone was the construction (2600 bce) of the great pyramids in Egypt. Khufu, the largest, is 236 metres (775 feet) along the base sides. It contains approximately 2.3 million blocks of two types of limestone and red granite. The limestone is believed to have been quarried from across the Nile. Blocks weighing as much as 15,000 kg (33,000 pounds) were transported long distances. Elevated into place. They show precise cutting that resulted in fine-fitting masonry.
From fire-setting to pneumatic power
One of the most complete early treatments of mining methods in Europe is by the German scholar Georgius Agricola in his De re metallica (1556). He describes detailed methods of driving shafts and tunnels. Soft ore and rock were laboriously mined with a pick. Harder ore required a pick and hammer, wedges, or heat.
Fire setting involved piling a heap of logs at the rock face and burning them. The heat weakened or fractured the rock because of thermal expansion. Crude ventilation and pumping systems were utilized where necessary. Hoisting up shafts and inclines was done with a windlass. Haulage was in “trucks” and wheelbarrows. Timber support systems were employed in tunnels.
Great progress in mining was made when the secret of black powder reached the West. Probably from China in the late Middle Ages. This was replaced as an explosive in the mid-19th century with dynamite. Since 1956, both ammonium nitrate fuel-blasting agents and slurries (mixtures of water, fuels, and oxidizers) have come into extensive use. A steel drill with a wedge point and a hammer were first used to drill holes for placement of explosives. Experience showed that proper placement of holes and firing order are important in obtaining maximum rock breakage in mines.
The invention of mechanical drills powered by compressed air (pneumatic hammers) increased markedly the capability to mine hard rock. It decreased the cost and time for excavation severalfold. The Englishman Richard Trevithick is reported to have invented a rotary steam-driven drill in 1813. Mechanical piston drills utilizing attached bits on drill rods and moving up and down like a piston in a cylinder date from 1843. In Germany in 1853, a drill that resembled modern air drills was invented. Piston drills were superseded by hammer drills run by compressed air. Their performance improved with better design and the availability of quality steel.
Developments in drilling were accompanied by improvements in loading methods. From handloading with shovels to various types of mechanical loaders. Haulage likewise evolved from human and animal portage. To mine cars drawn by electric locomotives and conveyers. And to rubber-tired vehicles of large capacity. Similar developments took place in surface mining. Increasing the volume of production and lowering the cost of metallic and nonmetallic products drastically. Large stripping machines with excavating wheels used in surface coal mining are employed in other types of open-pit mines.
How miners solved the water and light crisis
Water used to be the miner’s worst enemy. It flooded shafts, ruined equipment, and made deep digging nearly impossible. Then James Watt showed up with the steam engine in the 18th century. Suddenly, steam-driven pumps could haul water out of the deep mines. The problem wasn’t gone, but it was manageable.
Lighting followed a similar path. Early miners relied on candles or oil-wick lamps burning whale oil, coal oil, or kerosene. It was dim. It was dangerous. By the 1890s, things got brighter but more volatile. Acetylene gas, generated by dripping water onto calcium carbide, burned in a metal reflector. A flint sparker lit the flame. It was bright enough to work by, but flammable gas in a mine? That’s a recipe for disaster.
The real shift came in the 1930s with battery-powered cap lamps. No open flame. No acetylene tanks. Just light. Since then, engineers have tweaked battery life, weight, and intensity. Miners can now see clearly without carrying a potential explosion on their heads.
It’s easy to romanticize mining. Think of the lone prospector with a pickaxe. That image is dead. Modern mining is about machines providing the brute force and trained professionals providing the strategy. We are pulling gold from underground depths of 4,000 meters. That’s over 13,000 feet down. Surface mines dig more than 700 meters deep. The scale is industrial, not artisanal.
How to find minerals using modern prospecting techniques
Finding a mineral deposit is called prospecting. Once you find a potential spot, called a prospect, you explore it. You need to know the size, shape, orientation, and mineral quality. You need to know where the good stuff is relative to the surface.
Traditional prospectors walked the land. They looked at outcrops, soil, and sediments. Direct observation still works. But modern prospectors use tools to narrow the search radius. They look for anomalies. An anomaly is a difference between what you see and what you expect to see.
Aerial and satellite imagery helps scan large areas quickly. Changes in geologic structure, rock type, soil, or vegetation can hint at mineralization below. Geophysical prospecting goes deeper. It uses gravity, magnetic, electrical, seismic, and radiometric methods. These tools measure rock properties like density, magnetic susceptibility, electrical conductivity, and radioactive decay.
Geochemical prospecting looks for chemical clues. Scientists collect samples of soil, lake sediments, water, glacial deposits, rocks, vegetation, animal tissues, microorganisms, gases, and air. They test for trace elements. Unusual concentrations point to a deposit.
Exploration methods: trenches, drifts, and core sampling
Once prospects are identified, field exploration begins. The method depends on the deposit type and depth. If the deposit outcrops at the surface, shallow trenches are dug with bulldozers or backhoes. Trenching gives accurate near-surface data and large sample volumes. But it’s limited by how deep the equipment can cut.
Sometimes, special drifts are driven. This is expensive and slow. Drifts are mostly used to create drilling sites. From there, a large volume can be explored to build a three-dimensional model of the ore body. Old shafts and drifts are also useful. They provide easy access for sampling existing reserves or exploring extensions.
The most common method is drilling probe holes. A diamond-tipped bit cuts a narrow kerf in the rock. It extracts a cylindrical core from the center. This is core sampling. The holes can be hundreds or thousands of meters long. The standard diameter is about 50 millimeters.
The cores are placed in special boxes in the order they were removed. Geologists log each core. They describe the rock types, minerals, and structural features like joints, faults, and bedding planes. They assess rock strength. The core is often split lengthwise. One half goes to a lab to determine the mineral grade.
Delineating the ore body with maps and models
Core holes are drilled in a regular pattern. Their locations are plotted on plan maps. To visualize the deposit at depth, holes are also plotted on vertical planes called sections. The geologist studies each section. Using data from maps, core logs, and knowledge of geological structures, they fill in the gaps between holes and planes.
This method constructs an ore body model. It works well for medium to small deposits with sharp boundaries between ore and waste. These are often mined underground. But for large deposits mined by open-pit methods, this approach is less common. It has largely been replaced by block models. Those are detailed in the surface mining section.
The goal isn’t just to find rock. It’s to understand its structure, quality, and volume before a single shovel moves.
The industry has moved from guesswork to precision. Anomalies are no longer just visual curiosities. They are data points. And data points make billion-dollar decisions.
Mapping the ore body
Mineral deposits don’t just sit there randomly. They have shapes. Most of them are tabular, wedged between parallel rock layers like a slice of bread in a loaf. To navigate these, miners rely on two measurements. Dip tells you the angle relative to the horizon. Strike gives you the compass direction.
You also need to know what’s above and what’s below. The rock sitting on top of the deposit is the hanging wall. The stuff underneath is the footwall. Simple terms. Critical for safety.
Grade isn’t static
Not all ore is created equal. The concentration of the valuable mineral is called its grade. This number fluctuates wildly across a single deposit.
Here is the hard truth. Just because a mineral is present doesn’t mean it’s worth digging up. There is a mine cutoff grade. Below this threshold, mining the material loses money. Once the rock is out of the ground, there’s another hurdle. The mill cutoff grade. This is the point below which processing the rock isn’t profitable anymore.
Then there’s the break-even grade. This is the tipping point. Costs equal revenue. Anything above is ore. Anything below is waste.
So how do you decide what is an exploitable reserve? You look at the numbers. Extraction costs vary wildly. They depend on the mining system, the machinery, and how long the mine lasts. It’s a complex calculus.
Take open-pit mines. They start at the surface. Cheap. Easy. But as you dig deeper, the physics change. Eventually, you might have to switch to underground mining. The cost per ton jumps. To justify that jump, the underground ore needs a higher grade. If it doesn’t, you leave it.
Surface mining dominates
More than two-thirds of the world’s yearly mineral production comes from surface mining. It’s the heavy hitter.
Three main types exist.
– Open-pit mining
– Strip mining
– Quarrying
They differ in shape, technique, and what they pull out of the earth.
Open-pit mining creates a massive hole. Sometimes it shaves off a hilltop. Strip mining is different. It’s linear. A dragline or giant shovel peels back long, narrow strips of earth. You dig out the mineral, move to the next strip, and dump the waste from the new strip into the hole you just made. It’s efficient for thin, flat coal deposits. That’s why it’s often categorized separately.
Quarrying splits into two camps. One is for ornamental stone. Specific colors, sizes, shapes. Expensive work. The other is for sand, gravel, and crushed stone. Used for roads, cement, concrete. The techniques here mirror open-pit mining. So we focus on the ornamental side. The high-end stuff.
The geometry of the pit
Open-pit mines are built in layers called benches.
How thick are they? Usually 12 to 15 meters. About 40 to 50 feet. Depends on the rock and the equipment. Miners work on multiple benches at once. They get around using ramps. These ramps are wide. 20 to 40 meters wide. You extend a ramp downward to start a new level. You cut deep, then widen it out. That forms the new pit bottom.
The walls matter. A lot.
The slope is determined by rock strength. Stability is non-negotiable. Especially as the pit gets deeper.
Here is the tension. Steepening the slope by just a few degrees can save millions in stripping costs. It can increase ore recovery. But it also invites collapse. Slope failures can involve millions of tons of material. It’s a risk. Mines run constant stability programs. They analyze structural data, water tables, and blasting patterns. One large pit might use five or more different slope angles.
As you dig deeper, you strip more waste rock. Eventually, the math breaks. The value of the exposed ore no longer covers the cost of getting it out. Mining stops.
This balance is the stripping ratio. Waste rock divided by ore removed. The break-even stripping ratio depends on ore value and costs. When you hit it, you’re done.
How to calculate ore reserves for open-pit mines
Reserve estimation isn’t just guesswork. It starts with drilling probe holes. Plot those locations on a map. Cut vertical sections through them. You get the vertical extent of the ore body. Bench locations follow from there.
But you mine in horizontal layers. So you calculate reserves in horizontal slices too. Each slice matches a bench height. You chop these slices into blocks along coordinate lines. Block length and width? Usually one to three times the bench height.
Determine the grade for every single block. Stack them up. You have a block model. It needs to be bigger than the actual ore reserve. Why? Because you have to dig the pit to expose it.
Now throw money into the mix. Costs vary. Expected revenues vary. Grade matters. Location matters. This creates an economic block model. Some blocks end up inside the pit. Others stay outside. How do you decide which ones go?
The floating cone technique is the standard. Imagine two dimensions first. To remove an ore block, you must remove everything above it. Draw an inverted triangle. Sides match the slope angle. Base sits on the surface. Apex hits the ore block. In 3D? It’s a cone.
Compare the ore’s value at the apex against the cost of removing the whole cone. Positive net value? Mine it. Run this check for every block in the model. The result is your final pit outline.
Drilling and blasting operations in open-pit mines
Big mines move nearly a million tons of material daily. Small ones? A couple of thousand. The process boils down to four steps: drilling, blasting, loading, hauling.
Large mines use rotary drills. Holes range from 150 to 450 mm in diameter. The bit has three cones with steel or tungsten carbide teeth. It rotates under heavy load. Breaks rock by compression and shear. Air compressors blast cuttings out through the center of the drill string.
Smaller pits use pneumatic or hydraulic percussion machines. Truck or crawler mounted. Holes are smaller, 75 to 120 mm.
Pattern matters. You need specific fragmentation for later loading and crushing. Two terms define the pattern: burden and spacing. Burden is the shortest distance from the hole to the bench face. Spacing is the gap between holes. Burden is typically 25 to 35 times the hole diameter. Spacing usually equals the burden.
Most explosives are ANFO. Ammonium nitrate slurry mixed with fuel oil. Pumped from tanker trucks. A single 400 mm hole, 7.5 meters deep, can generate about one billion horsepower. That’s a lot of energy. The goal is useful fragmentation. Not just noise. Blasters fire holes in a controlled sequence to manage the force.
Loading and hauling heavy materials
The goal of blasting is simple. Break the rock. Displace it into a pile. Make it easy to load.
Electric or diesel-electric shovels do the lifting in large pits. Hydraulic ones too. Size is defined by the dipper or bucket. Common capacities range from 15 to 50 cubic meters. One bite can lift 30 to 100 tons.
Trucks must match the shovel. Rule of thumb? Fill the truck in four to six shovel swings. A 15-cubic-meter shovel pairs with a 120 to 180-ton truck. The biggest trucks haul over 350 tons. They have engines producing more than 3,500 horsepower. Tire diameters exceed 3 meters.
Wheel loaders also play a role. Their high mobility helps.
Transporting ore from deep pits
Pits are getting deeper. The deepest exceed 800 meters. Hauling up that far with trucks is expensive. Alternatives emerge.
Belt conveyors are common. But they require in-pit crushing. Run-of-mine material must be broken down before transport. Steep angles are a problem. Most belts max out at 18 degrees. Transporting directly up pit walls? Engineers are still developing techniques for that.
What happens after the ore comes out of the ground
The truck drives off. Waste rock heads for a dump. The good stuff, the ore, goes to a processing plant. Sometimes it skips the plant entirely if the quality is high enough to ship direct. But that’s rare. Most operations sort sub-ore into separate piles. They might dig it up later. They might treat it with chemicals right there in the dump. That’s heap leaching. It extracts metals without moving the rock into a mill.
Why we quarry stone that isn’t metal
We don’t build skyscrapers out of granite. Not usually. But we want it. It looks good. It lasts. It’s easy to clean. Granite, limestone, sandstone, marble, slate, gneiss, serpentine. These are the heavy hitters. If it’s used for structure, walls, floors, or just decoration, it’s building stone. If it’s cut to specific sizes for construction or monuments, it becomes dimension stone.
Good dimension stone needs to be consistent. Same color. Same texture. No cracks. It has to take a polish. It has to survive the rain. This section isn’t about mining dirt. It’s about cutting rock.
How the pit gets shaped
Quarries aren’t always holes in the ground. Sometimes they’re hillsides. The first step is stripping. Trees go. Underbrush goes. Then the topsoil. It gets stockpiled for later reclamation. You can’t just throw it away.
The rock comes out in benches. Slices. Usually 4.5 to 6 meters thick. But nature doesn’t follow rules. If there’s a natural seam, the quarry follows that.
The blocks they pull out are massive. Sometimes called loafs. Six meters high. Six meters deep. Up to 18 meters long. That’s 1,200 to 2,000 tons. You don’t move that with a forklift. Traditionally, fixed derricks did the work. The derrick’s reach decided the shape of the quarry. Now, mobile front-end loaders are taking over. They lift 30-ton mill blocks. The layout changes because the machinery changes.
Waste is the enemy here. Only 15 to 20 percent of the stone you dig is usable. The rest is rubble. Planning where that waste pile goes is a major part of the job.
Cutting stone without breaking it
How do you separate a block from the mountain?
For years, the wire saw was king. It’s a steel wire, helicoidal, about 6mm thick. It carries a slurry of water and abrasive—sand, aluminum oxide, silicon carbide. The wire doesn’t cut the stone. The abrasive does. The wire just delivers it.
The wire wears down. The cut gets narrower. If the wire breaks, you’re stuck. Starting over is a nightmare. So the wire has to be long enough to finish the job. In granite, you use about 27 meters of wire for every square meter of cut. A single 6×9 meter cut needs 1,450 meters. A whole setup might use 3 to 5 kilometers of wire. Driven by electric or diesel motors. Guided by sheave wheels. One wire can make multiple cuts if you angle the wheels right.
The benefit? A smooth cut. No damage to the surrounding rock. Less work later. But it’s slow. And it’s being replaced.
Burning and drilling your way through rock
For hard rocks like granite, heat works. Jet burners use fuel oil and oxygen or air. It burns like a miniature rocket engine. High temperature. High velocity. It cuts a channel 75 to 150 mm wide and up to 6 meters deep. Handheld or automated. It melts its way through.
Or you can drill. Pneumatic or hydraulic percussion drills make long, parallel holes. Line drilling uses closely spaced pilot holes. Then a larger bit reams out the middle. In softer rock, you just chip out the web between the holes.
Which method you use depends on the rock. Hard granite might get burned. Soft stone gets drilled. The goal is always the same. Get the block out. Don’t break it. Don’t waste it.
Splitting rock without the boom
Explosives aren’t the only way to break stone. Sometimes you want a clean split, not a crater.
If holes are drilled 125 to 250 mm apart, you can fracture the rock between them. It’s about precision. One method uses special explosives. They don’t blast the rock out. They press high-pressure gas against the hole walls. The pressure builds. Then crack. A fissure forms right along the firing line. Controlled chaos.
Old school workers use feathers and wedges. It’s mechanical. Brutal. Effective.
Feathers are two half-round steel pieces. You jam them into every hole along the side of the block. Then you slide a wedge between each pair. Hit the wedges with a sledgehammer. The force transfers to the feathers. The rock doesn’t want to move. The pressure has nowhere to go but through the stone. A crack line emerges.
This technique sets the bottom of a block. It also slices large chunks into smaller ones. For that last step, you only need shallow holes. A few centimeters deep. Small diameter.
There are other tricks too. Special cement grouts that expand as they cure. Hydraulic pressurization. All do the same thing: push until the stone gives.
The diamond wire saw advantage
Newer tech is quieter. Cleaner. More precise.
Enter the diamond wire saw. It looks like a thick cable. It’s 6-mm steel at the core. Wrapped in diamond-impregnated beads. Plastic spacers sit between the beads. Those spacers matter. They stop the rock from grinding the steel cable to dust. They keep the diamonds in place.
Water does the heavy lifting here. Clean water flushes the cut. It cools the wire. It keeps the diamonds from overheating and dulling.
To start a cut, you need two boreholes. One drilled vertically from the top corner. One drilled horizontally from the bottom. They intersect. You thread the wire through. A driving mechanism pulls it. Tension is key.
The cut is narrow. Very narrow. That means less waste. Less stone turned into dust. The stone doesn’t crack or fissure from vibration. Once the wire is looped and moving, you don’t even need an operator standing there. It just runs.
Chainsaws for stone
Yes, chainsaws can cut rock. Not wood. Rock.
These aren’t your backyard tools. They’re massive. They look like timber saws but carry tungsten carbide or diamond-tipped cutters. They handle soft stones. Marbles. Limestones. Travertines. Shales like slate. Some sandstones.
The chain has removable links. They hold the tools. The chain rides in a channel. The walls and bottom of that channel are replaceable. They wear out. You swap them. The machine moves itself. A rack-and-pinion mechanism drives it along modular tracks.
It’s heavy machinery. It’s loud. But it works on materials that would ruin a standard blade.
Water jet channeling
If you want silence, use water.
High-pressure water jets cut channels in stone. Pure water can do it. Or water mixed with an abrasive substance. The water shoots through a tiny nozzle. The velocity is extreme.
It creates new cracks. It penetrates existing ones. Thin layers of rock slice away. Layer by layer.
The result? Narrow, straight channels. Almost no noise. No damage to the surrounding wall surface. It’s gentle despite the force.
Underground mining

Why deep mining costs more per ton
Surface mining hits a wall. Not a physical one, but a math one. When ore sits deep underground, the waste rock you have to haul away to get to it becomes too heavy to lift. You switch to underground techniques. It’s expensive. Every ton mined underground costs more than its surface counterpart. Why? The equipment is smaller. Ground conditions and ore geometry squeeze the machines. Access is tight. Productivity tanks. You might get five to fifty times less output per worker per shift compared to open pits.
There is a tradeoff. Underground miners pull only ore. Open pits strip tons of waste for every ton of valuable rock. That selectivity has value.
Choosing the right underground mining method
Once you commit to going underground, the method depends on the rock. Size matters. Shape matters. Orientation matters. Grade matters. If the ore is high grade or high price, you can afford expensive methods. You want to keep ore and waste separate. Highly selective extraction does this. But if you can sort them later, maybe with magnets for magnetite, you can use bulk mining. It’s cheaper. Less selective. Faster.
The dip of the ore body changes everything. A dip over 50 degrees lets you use gravity. Ore falls down. Easy. A dip under 25 degrees requires rubber-tired equipment to haul ore. Steep angles are tricky. Special designs are needed for the middle ground.
The openings you carve out are called stopes or rooms. Stoping happens in two steps. First is development. You prepare the ore blocks. It is costly. The second step is production. You mine the ore. It is cheaper. You try to maximize production for every bit of development. For steep ore bodies, you space production levels far apart. Larger openings mean bigger equipment. Fewer machines. Less work.
Rock strength limits your openings. Rock is stronger than highway concrete. But it has defects. Cracks. Faults. If those defects are close together or filled with crushed material, you must keep openings small.
Depth brings pressure. As you go deeper, the weight of the overlying rock increases. Side pressure rises too. It can be one-third of the vertical pressure or three times higher. In the deepest mines, over 4 kilometers down, the pressure is intense. The rock explodes. These are rock bursts. They stop mining. Rock mechanics engineering deals with this. It studies how rock mass interacts with mine openings.
Building the mine infrastructure
You cannot mine without development. Capital investment comes first. Open pits build roads and strip waste. Underground mines are more complex.
Vertical access and shafts
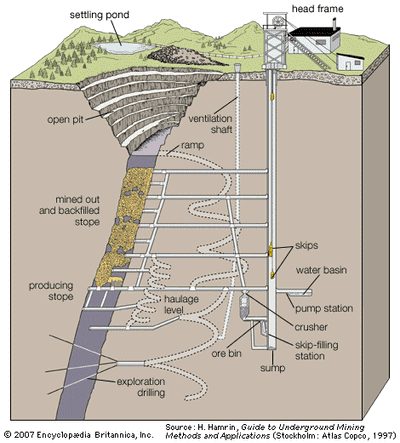
The main entrance is a shaft. A vertical hole sunk from the surface. It goes below the deepest planned mining level. Horizontal drifts branch off at regular intervals. These are called levels. Elevators, or cages, move workers and machines down. Ore comes up in skips. Special conveyances.
Shafts have compartments. They hold compressed air lines. Electric power cables. Water pipes. They also ventilate the mine. Fresh air enters through one shaft. Stale air leaves through another. Or vice versa.
Ramps offer another way down. Tunnels driven downward from the surface. Internal ramps connect levels. In mountains, you can drive horizontal tunnels from the side. These are adits. Common in metal mining.
Why gravity does the heavy lifting in ore transport
Mined ore doesn’t just sit there. It gets dumped into ore passes —vertical or near-vertical shafts that let gravity do the work. The rock falls straight down to the lowest level of the mine. From there, it’s crushed, stuffed into a bin, and loaded into skips. These skips ride up to the surface head frame, dump their load, and drop back down. Repeat.
Some mines use conveyor belts or trucks instead. Waste rock? Often left underground to save space. When it does need to move, it uses similar vertical openings.
The mechanics of raising and winzes
Creating these vertical connections isn’t just digging up. It’s called raising. Workers start from the bottom and drive upward. Raise-boring machines drill holes 2 to 5 meters wide, stretching hundreds of meters long. These openings serve multiple purposes: ore passes, waste chutes, or ventilation shafts.
Go downward from an upper level? That’s a winze. Think of it as an internal shaft.
Drifts: the horizontal backbone
All horizontal tunnels are drifts. Simple as that. Their size and shape depend on the job. Haulage? Ventilation? Exploration? Each needs a specific footprint.
- Footwall drift : Runs parallel to the ore body, sitting in the rock below it.
- Crosscut : Drives from the footwall across the ore body.
- Ramp : A sloped drift, still classified under this generic term.
How to extend a drift, one round at a time
Building a drift is a five-step loop. You do this for every “round” of rock you want to remove.
- Drilling
- Blasting
- Loading and hauling
- Scaling
- Reinforcing
Drilling methods vary. Rock type, opening size, and mechanization level dictate the approach. Most mines rely on diesel-powered, rubber-tired carriers carrying multiple drills. These are drill jumbos. The drills themselves run on compressed air or hydraulic fluid.
Percussive drilling is brutal. A piston hammers back and forth. On the forward stroke, it hits a steel bar. A special cutter, or bit, attached to the front, gets forced into the rock. The piston retracts, the bit rotates, and the cycle repeats. High energy, high frequency—2,000 to 3,000 blows per minute. Hard rock doesn’t stand a chance.
The art of the blast pattern
The rock face gets drilled with parallel holes. Diameters range from 38 to 64 mm. But here’s the trick: one or more larger holes are left uncharged. They act as a free surface. They give the rock somewhere to break into. Expansion room.
From dynamite to ANFO
Explosives go into those holes. Sticks, cartridges, or pumped slurry. The chemistry generates massive gas pressure. This pressure creates new fractures and widens existing ones. The rock breaks. It moves.
Dynamite used to be the standard. Not anymore. ANFO dominates now. It’s a mix of ammonium nitrate and fuel oil. Alone, neither is explosive. Mix them—94.5% AN, 5.5% FO—and ignite it. The reaction is violent. Efficient. Cheap.


Timing the Blast and Moving the Rock
The aftermath of an explosion is messy. You get carbon dioxide, water vapor, and nitrogen. These are standard air components. But get the fuel oil ratio wrong, and you get poison. Too much oil creates carbon monoxide. Too little creates nitrous oxides. Both kill. That is why ventilation systems suck these gases out. Blasting usually happens between shifts, or after the last miner clocks out. Empty mines are safer mines.
Order matters. You don’t just light every hole at once. You start near the empty space, the “free face.” Then you work outward. This creates room for the broken rock to move into. It’s a choreography of destruction. Timing is everything.
Old-school electric systems used a resistive element in the cap. Current heats it up. It ignites a fuse head. That burns a chemical compound at a set speed. This delay triggers the primer—usually lead azide or PETN. The primer explodes, lighting the main ANFO charge. The gap between delays? Usually 25 milliseconds.
Newer caps use microcircuitry. Electric delays. They’re tighter. Less variation. More options for timing sequences. Precision costs money, but it saves rock and time.
Once the rock is broken, you need to move it. LHD units—Load, Haul, Dump—are the workhorses. They range from tiny machines carrying less than a ton to beasts hauling 25 tons. In narrow veins, you might see overshot loaders. They push a bucket into the pile, lift it, and rotate it backward to dump the load. Often powered by compressed air.
Other loaders use gathering arms. They sweep the debris into a feeder, then onto a conveyor belt into trucks. Some of these are remote-controlled. No driver in the cab. Just a guy watching a TV monitor miles away.
Cleaning Up and Holding the Ceiling
Before you blast again, you clean up. This is called scaling. Loose rock on the roof or walls is a death trap. In small tunnels, miners use long steel or aluminum bars to knock it down manually. In big mechanized mines, machines with impact hammers or scaling claws do the job from a safe distance.
Safety isn’t just about removing loose rocks. It’s about keeping the rest from falling. Ideally, the rock supports itself. You drill holes and insert rock bolts. A steel bolt with an expansion anchor goes in. You turn it. The anchor expands against the hole wall. A faceplate compresses against the rock surface. It locks the blocks together.
This creates an arch. A self-supporting structure within the rock mass. If the rock is fragmented, you add steel netting, like chain-link fencing, between the bolts. Some mines grout rebar or steel cables into the holes. Others spray shotcrete—concrete applied in layers—onto the surfaces. It’s messy, loud, and effective.
Keeping the Air Moving and Cool
Ventilation is non-negotiable. Miners need to breathe. But it’s more than that. Diesel engines need oxygen to burn fuel. They also produce exhaust that needs diluting. Explosives create gases that need flushing out.
Fans push fresh air in. They pull contaminated air out. In cold climates, that incoming air is frozen. Heaters warm it up. In deep mines, the rock is hot. The air comes back sweltering. Refrigeration systems cool it down. This burns massive amounts of energy.
High energy costs drive changes. Mines are sealing off unused sections to reduce the volume of air to move. They are switching from diesel to electric machines. Electric equipment produces less heat and no exhaust. It simplifies the ventilation puzzle.
Why does this matter? Because underground environments are hostile. Air is life. Rock is danger. The technology bridges the gap between staying alive and getting the job done.
Scaling is an extremely important step in making the workplace safe.
It’s not just a procedure. It’s a ritual. You blast. You load. You scale. You reinforce. You vent. Repeat. The cycle is relentless.
How underground mines keep the lights on
Good lighting isn’t just a nice-to-have. It’s the difference between seeing a hazard and walking right into it.
Every miner down there has a lamp strapped to their hard hat. The battery hangs heavy on their belt. In some older or smaller operations, that single beam is all you’ve got. You work by the glow of your own headlamp. In modern setups, though, heavy machinery does the heavy lifting—and the heavy lighting. These rigs come with high-powered lights that flood the workspace, pushing back the dark so humans can actually see what they’re doing.
Then there’s the fixed infrastructure. Travel ways, shaft stations, dumping points—they all get permanent fixtures. You can’t navigate a mine in total blackness.
Managing the water table
Water is the variable you can’t ignore.
Some mines deal with minor seepage. They recycle the water used for drilling, keep it clean, and reuse it. Simple. Other mines face a deluge. Water rushes in from the surrounding rock, threatening to swallow the operation whole. In those extreme cases, engineers build special water doors and reinforced underground chambers. They’re designed to hold back sudden, massive inflows before the mine floods.
Where does the water go? It flows or gets pumped to a central spot called a sump. From there, pipes run it up the shaft to the surface. Once above ground, it gets treated and disposed of properly. You don’t just dump raw mine water into the local creek.
Why flat-lying deposits matter
Most ore deposits we mine today started life in water. An ancient ocean floor. A prehistoric swamp. Over millions of years, pressure compacted those sediments. They might have shifted or distorted slightly, but they kept their basic horizontal layer.
This structure changes how you dig.
If the seam is flat, you have two main options: longwall mining or room-and-pillar mining. Which one you pick depends on a few factors. How thick is the seam? Is the rock above it strong enough to hold up? Can you afford to let the surface sink?
It’s a calculation of risk versus reward.
The room-and-pillar method
This technique is exactly what it sounds like. You mine out rooms of ore. You leave pillars of unmined material behind.
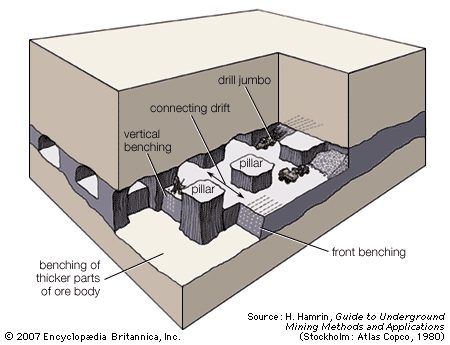

Why room-and-pillar mining is the standard
Room-and-pillar isn’t just a method. It is the default. Think of it as the vanilla ice cream of underground extraction. You drive parallel tunnels, called drifts. Then you connect them. Regular intervals. If the spacing matches in both directions, you get a grid. A checkerboard of mined-out rooms and standing pillars.
Those pillars aren’t decoration. They hold up the roof. Without them, the mine collapses. Simple physics. In some operations, once they hit the edge of the deposit, miners go back and harvest those pillars. It’s risky. It means controlled collapse. But it recovers more ore.
How longwall mining works for soft minerals
Longwall mining is different. It’s industrial. Mechanical. Precise.
The ore body gets sliced into rectangular panels. Two parallel drifts run along the long edges. They handle ventilation and transport. A crosscut connects them at the end. That crosscut is the workhorse. It’s called the longwall face.
Here’s the trick. Movable hydraulic supports slide forward. They create a safe canopy. Under that roof, a cutting machine shuttles back and forth. It slices the mineral. An armored conveyor carries the load away. The supports advance. The roof behind them caves in. Intentionally. This is for soft stuff. Trona. Salt. Potash. Coal. Mineral-bearing shale. Things a machine can actually cut.
Hard rock changes the game. Gold reefs in South Africa? Platinum? You can’t just slice it. You drill and blast. The ore is scraped to a collection point. Support comes from hydraulic props, wooden packs, or filling the void with rock and sand. Same pattern. Different tools.
Why steep deposits need a different approach
Not all veins lie flat. Many are vertical. Or near-vertical. Geology is messy. Distortions happen. Emplacement angles vary. Sharp boundaries between ore and waste rock make this manageable. If the dip is steep—greater than 55 degrees—and the rock is strong, you switch tactics.
Blasthole stoping for vertical ore bodies
This is where blasthole stoping comes in. It’s for thick, steep deposits with regular boundaries.
Start at the bottom. Drive a drift along the ore. Enlarge it into a trough. At the end of that trough, drive a raise up to the level above. Blast that raise into a vertical slot. It spans the width of the ore body.
From the drilling level above, drill long parallel blastholes. About 4 to 6 inches in diameter. Blasting starts at the slot. Miners retreat down the drift. They blast successive slices. A large room opens up.
How do you get the ore out of that trough? Several techniques. Grizzlies. Conveyors. Shovels. The method depends on the layout. The goal remains the same. Extract the ore. Leave the waste. Keep the roof from crushing you.
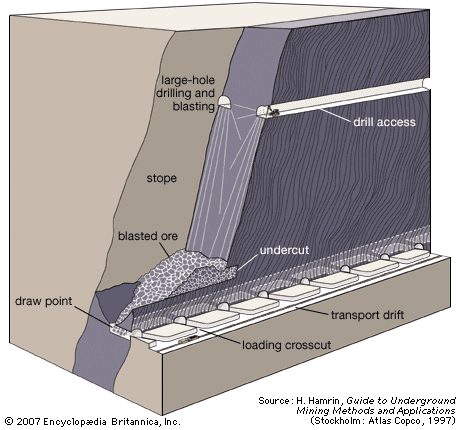

Sublevel and vertical retreat stoping variations
The classic blasthole stoping isn’t the only way to dig. You can tweak the geometry to fit the rock. Take sublevel stoping. Instead of one massive vertical slot, you drill shorter blastholes from sublevels stacked at tighter vertical intervals. It’s a step-by-step climb, drilling down from above in manageable chunks.
Vertical retreat mining flips the script entirely. The stope doesn’t look like a vertical slice of cake. It’s a trough. Think of it as a horizontal slot. You only charge the very bottom of the blastholes with explosives. Bang. A thin horizontal slice of ore drops into the trough. You move up. Charge the next short section of the hole. Repeat. You keep blasting upward slices until you hit the ceiling. It’s methodical. Layer by layer.
How shrinkage stoping works in narrow veins
Then there’s shrinkage stoping. This method picks its battles. It only works on steeply dipping, relatively narrow ore bodies. The boundaries need to be regular, too. No jagged, unpredictable edges.
The rock itself has to play nice. Both the hanging wall and the footwall must be strong. The ore needs to hold up, too. It can’t degrade just because it’s sitting in the stope while you mine around it. Shrinkage stoping relies on the ore itself to support the open space as you work. If the rock is weak, or if the ore crumbles during storage, this method falls apart.
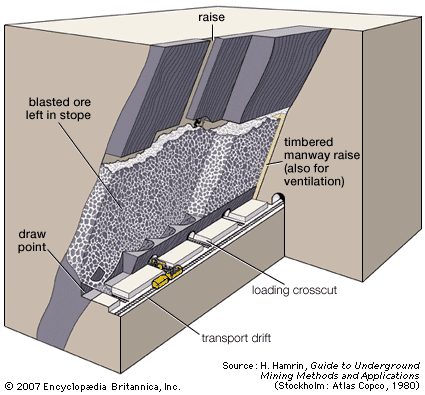

How shrinkage stoping works in practice
It’s a vertical dance. Miners climb up through the rubble, drilling into the solid ceiling of the stope. They pack those holes with explosives. Then they pull out 30 to 40 percent of the broken ore from the bottom.
Why not take it all?
Because they need space. The remaining ore acts as a temporary floor and support. They blast the slice above, letting it crash down to fill the void they just created. The miners walk back into the chaos, stepping on the new debris to repeat the process.
It works. But it’s slow. And it’s hard to automate.
The delay between starting the dig and finally hauling out every last rock can stretch out significantly. It’s a method that relies on human timing and physical presence, not just heavy machinery.
Why cut-and-fill mining adapts better
If shrinkage stoping is rigid, cut-and-fill is flexible. It handles weird ore body shapes and unstable ground where other methods fail. Alongside room-and-pillar mining, it’s the most adaptable underground technique available.
The logic is simple. You mine a horizontal slice of ore. Then you fill the empty space.
Usually, the fill comes from waste rock or tailings generated by the processing plant. It turns waste into a tool. Once that void is packed, you mine the next slice up. Or down.
The fill becomes the platform for the next cut.
There are two main ways to do this.
Overhand cut-and-fill starts at the bottom and works upward. It’s the standard approach. Gravity helps. The fill sits below you, supporting your weight as you dig the layer above.
Underhand cut-and-fill reverses the flow. You start at the top and dig down. This is trickier. When you remove the ore above, you’re left with a ceiling of air. You can’t just throw waste rock in there. It won’t hold.
You have to mix cement into the fill. It creates a solid, concrete-like roof. Only then can workers safely enter the space below to continue the cycle. It costs more in materials. But it lets you mine deposits that would otherwise be too dangerous or unstable to touch.
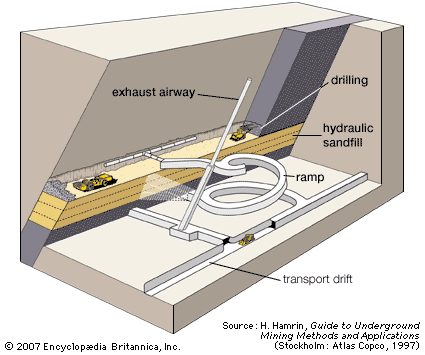

Loading out with ramps or rill mining hybrids
Look at that diagram again. The ramp feeds directly into the stope. That’s the access point. As miners climb higher, they build raises inside the fill itself. These aren’t just decorative. They act as manways for crew movement or ore passes for gravity-fed rock flow. You could skip the internal raises entirely, of course. Load the blasted rock into an LHD — a Load Haul Dump vehicle — and drive it to an ore pass in the footwall. It’s a choice between vertical infrastructure and horizontal hauling.
Ground conditions allowing, there’s another option. Rill mining.
It’s a hybrid beast. Part cut-and-fill, part sublevel stoping. Drifts are driven through the ore body, but they aren’t packed tight. They’re separated by a slice of ore two or three normal slices high. The drilling is longhole. The blasting removes vertical slices. But here’s the twist: as each slice goes, fill goes in immediately. You keep the open ground small. Less exposed rock means less chance of a collapse. It’s stability through constant replacement.
How sublevel caving actually works
The name gives it away, if you know where to look.
Sublevel refers to the workspace. Miners don’t just operate on main levels. They work on multiple intermediate floors stacked between the primary tunnels. It’s a vertical sandwich of activity.
Caving is the consequence. You aren’t holding the roof up with timber or cement in this specific setup. As the ore is extracted, the hanging wall above it gives way. The surface above that also sinks. The rock falls into the void. It’s controlled chaos. The method relies on the ground’s ability to collapse predictably after the support material is gone.
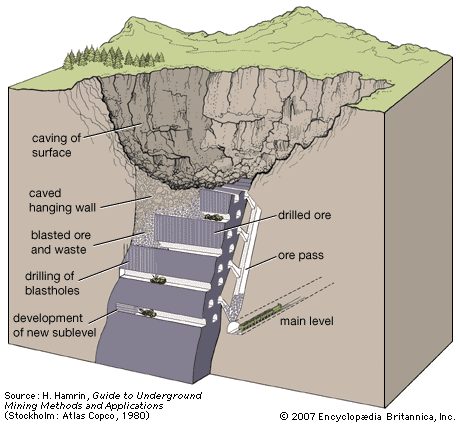

How transverse sublevel caving manages waste and dilution
Look at the geometry. Parallel crosscuts slice through the ore body. They run from the footwall drift to the hanging wall. Every sublevel does this. The next sublevel down? It sits right between the ones above. Staggered.
Blastholes get drilled in a fan pattern. Regular intervals along those crosscuts. Then you blow. Start at the hanging wall on the topmost sublevel.
Here is the tricky part. As you pull broken ore out, material from above follows. Waste from the hanging wall caves in. The more ore you draw, the more waste comes with it. Dilution rises. You have a limit. Once waste hits a certain threshold, you stop loading. Blast the next fan. Wait for the mix to settle. Repeat.
Is this always bad? No. It depends on what you are mining. Magnetite is forgiving. Ore and waste separate easily. Cheaply. Dilution matters less here. For other minerals, mixing waste into your product is a disaster. You pay for processing rock that isn’t ore.
For certain minerals such as magnetite, in which ore and waste can be easily and inexpensively separated, dilution of the ore is less of a problem than for other minerals.
When to use panel and block caving for massive deposits
Stoping methods work for some jobs. Sublevel caving handles others. But massive deposits need a different approach. Panel caving. Block caving. This is the method built specifically for scale.
It is not universal. You need specific conditions. Four of them.
- Large ore bodies with a steep dip. The rock needs to slide.
- Massive vertical extension. You need depth. Lots of it.
- Rock that caves naturally. It must break into manageable chunks. If it stays in huge boulders, you are stuck.
- Surface that permits subsidence. The ground above will drop. You need space for it.
If you have these four things, panel caving is likely your best bet. It turns the weight of the rock against itself. Gravity does the breaking. You just manage the flow.
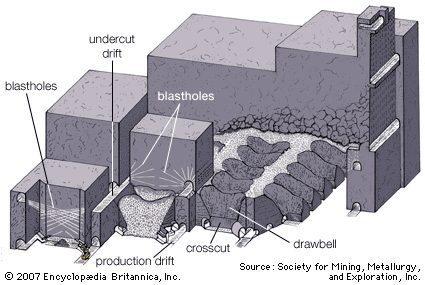

Why undercut-and-fill lets rock break itself
You dig a hole. Then you dig another one 15 metres higher.
That’s the setup.
These two levels sit 100 to 300 metres below the top of the ore body. You don’t start at the top. You start deep.
At that upper undercut level, you drive parallel tunnels. Then you blast the rock between them. Boom. You’ve got a massive horizontal slot. This slot does the heavy lifting. It removes the support holding up the overlying ore.
Gravity takes over.
The ore caves. It breaks into pieces small enough to handle. It falls into drawbells at the production level below. These are basically bottom troughs waiting to catch the debris.
LHD machines—Load, Haul, Dump—sweep in. They scoop up the broken ore. They haul it to ore passes.
Here’s the trick.
Only the rock used to create those initial troughs and undercuts needs drilling and blasting. The rest? It breaks itself. It tumbles down as caving progresses upward toward the surface.
The real work isn’t breaking the rock. It’s keeping those draw points open while the mountain collapses around them. If the troughs clog, the mine stops. You have to maintain the flow during the drawing period.
How placer mining differs from underground digging
Placer mining is a different beast entirely.
You aren’t drilling into solid rock. You aren’t blasting. You aren’t waiting for gravity to cave a shaft.
Placer deposits are loose. They’re gravel, sand, or dirt. The valuable minerals—usually gold, but also tin or gemstones—have been washed away from their original source. They settled in riverbeds, beaches, or floodplains.
Because the material is unconsolidated, you don’t need the massive infrastructure of an undercut-and-fill operation. No drawbells. No LHD machines navigating tight tunnels.
You just need to separate the heavy stuff from the light stuff.
Water is your primary tool. It washes away the sand and dirt. The dense minerals sink.
This method is cheaper. Faster. Less dangerous. But it only works if the ore isn’t locked inside a hard rock matrix. You can’t placer mine a vein of quartz. You can only mine what the river has already done for you.
So why do we still go underground?
Because the best veins aren’t in the riverbed. They’re deep. Locked tight. Waiting for you to break them open.
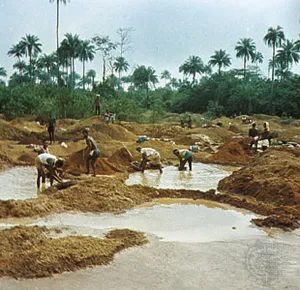

Why heavy minerals sink while sand stays on top
Placers are messy. They’re piles of unconsolidated detrital material that happen to contain valuable minerals. Nature builds them through chemical weathering, stream flow, marine action, or wind. The result is a concentrate of stuff that matters.
Gold. Tin. Platinum. Diamonds. You’ll also find titaniferous and ferrous iron sands, gemstones like rubies and emeralds, and abrasives such as rutile and zircon. These aren’t random picks. They share two traits. High specific gravity. Physical toughness. They survive the journey. Everything else washes away.
Where to find the most profitable placer deposits
Not all placers are created equal. Stream (or alluvial) placers and beach placers dominate the economic landscape. Running water forms the stream types. Shore waves act on those existing stream deposits to create beach placers.
Geology is messy over long time scales. Sea levels rise. Land shifts. This means you can find placers at any elevation. Way above sea level. Deep below it. The location doesn’t dictate the method as much as the physical conditions do.
Miners look at the extent. The thickness. The character of the bedrock. They check the orientation of the deposit. How thick is the overburden? Is there water available? What is the value per unit volume?
If the deposit is too thin or buried too deep for surface work, miners go underground. They sink shafts. They drive drifts. The material is unconsolidated, though. It collapses. Heavy support is mandatory. It’s expensive and difficult.
Most placers, however, stay on the surface. Operations split into two camps. Land-based. Or floating plants.
How panning separates value from waste
Panning is the ancestor of all modern placer mining. It’s simple. It’s effective. It relies entirely on density differences.
You put the sediment in a pan. Add water. Agitate it. The heavy minerals—gold, diamonds, platinum—sink to the bottom. The lighter sand and gravel swirl over the rim and disappear.
It’s slow. It’s labor-intensive. But it proves the concept. If you can separate the heavy stuff from the light stuff by hand, you can do it with machines. The principle remains the same. Gravity does the work. You just provide the medium.
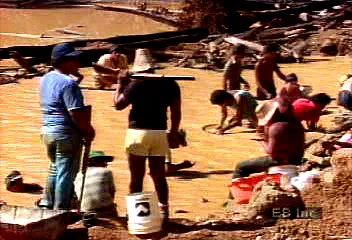
Why panning remains the stubborn standard for gold hunting
Panning is the brute-force method. It’s manual, sweaty, and unforgiving. You fill a pan with placer dirt, dunk it in still water, and get to work.
Underwater, you knead the sludge with both hands. You’re breaking down lumps, dissolving clay, picking out pebbles. It’s tactile. Messy. Then comes the shake. Hold the pan flat. Agitate it. The heavy stuff sinks.
Quick tilts. Rapid raises. Wash away the light top layer. Repeat until only the dense, valuable minerals remain at the bottom.
It’s simple. It’s also exhausting.
Where do you actually find gold with this method?
You don’t just pick a random spot. You look for the leftovers. Unworked ground near old mine sites. Crevices in the bedrock of river channels. Old river bars. Dry creek beds where the water used to drag the heavy stuff down.
If the water moved there before, the gold might still be there. Waiting.
The trick isn’t just washing. It’s knowing where the water stopped carrying the weight.
Sluicing changes the game. It scales up the process. Instead of one pan, you use a long, narrow trough. The water flows through it, carrying dirt and debris. Riffles—those little ridges on the bottom—catch the heavy particles while the lighter silt washes away.
It’s faster. Less bending. But it requires water flow. A constant stream. You can’t sluice in a puddle.
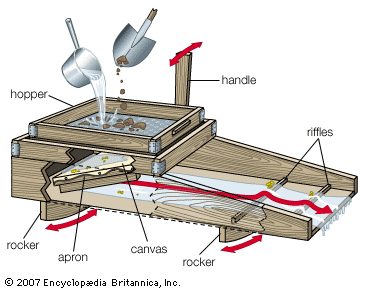

Sluice box mechanics and riffle design
You can also run a sluice box. It’s a sturdy rectangular box, usually lumber, with an open top. The bottom is roughened by riffles. Most are transversely mounted wooden bars. Sometimes they are poles, stone, iron, or rubber. You introduce water and placer dirt at the upper end of the inclined box. As it flows downward, the specially shaped riffles agitate the current. This prevents lighter material from settling. It retains the valuable heavy mineral.
Mechanized land-based placer operations
Mechanized land operations use draglines, shovels, backhoes, front-end loaders, and dozers to excavate placer material. The stuff gets delivered to concentrating plants or sluice boxes for mineral recovery. These methods suit narrow, shallow, or bouldery deposits. They also work on irregular and steep topography that other techniques can’t handle.
Ground sluicing is special. It mines natural placers and artificial ones like tailings piles. A natural flow of water disintegrates and transports material through a sluice. The valuable mineral concentrates there. Hydraulicking is another method. You move a stream of high-pressure water through a nozzle over the mining face. The resulting slurry moves into a downgrade channel. Then into a contained circuit for concentrating. Hydraulic mining sometimes mines coal underground. But its primary application is surface mining. It’s practical for fine-grained, unconsolidated material from placers, tailings, alluvium, and lateritic deposits. A major application is stripping overburden for open-pit mines.
Floating-plant operations with draglines or backhoes
Sometimes it’s most economic to excavate placer material with a shore-mounted dragline or backhoe. You pair it with a floating concentrating plant. The digging equipment might be on a separate barge or the same one. Material digs from the sides and bottom of the mining pond. It drops into the washing plant’s hopper. Oversized material gets rejected by screening. It goes to waste piles. Undersized material distributes to a gravity-separation system. This includes riffled sluices, jigs, or similar gear. After treatment, as much waste as possible returns to the pond. Swell means some waste deposits outside the pond area. The pond moves with the mining front.
The backhoe technique offers powerful digging and good control.
Dredging methods: mechanical vs hydraulic
Dredging is underwater excavation of a placer deposit by floating equipment. Systems are mechanical or hydraulic. This depends on the method of material transport.
The bucket-ladder, or bucket-line, dredge is traditional. It’s still the most flexible method for varying conditions. A single hull supports excavating and lifting mechanisms, beneficiation circuits, and waste-disposal systems. An endless chain of open buckets travels around a truss or ladder. The lower end rests on the mine face. That’s the bottom of the pond where excavation happens. The top end is near the dredge’s center, at the feed hopper. The chain passes around a drive sprocket called the upper tumbler. It loops downward to an idler sprocket called the lower tumbler. Filled buckets, supported by rollers, pull up the ladder. They dump their load into the hopper. After the treatment plant removes valuable material, waste dumps off the back end.
The clamshell dredge is another mechanical system. It uses a large single bucket at the end of cables. It operates in deeper water than other systems. It handles large particles and trash well. But it’s a discontinuous, batch-type system. It takes about one bite per minute.
Pure hydraulic dredging systems use pure suction, suction with hydrojet assistance, or entirely hydrojet. They suit digging small-sized loose material. Think sand and gravel, marine shell deposits, mill tailings, and unconsolidated overburden. Hydraulic dredging also mines deposits with diamonds, tin, tungsten, niobium-tantalum, titanium, monazite, and rare earths.
Underwater cutting heads greatly increase digging power. The cutter suction dredge has a rotary cutting head. It loosens and mixes soil at the mine face. Material falls to the mouth of a centrifugal pump. This transports slurry with 20 to 25 percent solids to the processing plant. A pile called a spud holds the dredge in place during cutting. Winches and wire ropes swing the dredge in an arc around the spud. It removes all material in the arc. Then the dredge moves ahead. The process repeats.
The cutter suction dredge suits softer deposits. The material has relatively low specific gravity or fine particle size. Like sand and gravel pits, phosphate mines, and various salt deposits.
Bucket-wheel dredges vs cutter suction dredges
The bucket-wheel dredge looks a lot like the cutter suction dredge. Same basic idea. But swap that rotary cutter for a wheel excavator, and you get a different beast entirely.
It digs harder. Better at the bottom of the cut. And it catches the heavy stuff—gold, tin—that usually slips past a standard cutter.
But there’s a catch. It’s mechanically complex. And expensive. You pay for that precision.
Why we haven’t mined the ocean yet
The sea is basically a mineral warehouse. Huge one. We’ve barely touched it.
Why?
Because digging up minerals on land is easier. Cheaper. No real pressure to go underwater right now.
Plus, the tech isn’t quite there yet. We don’t really know how to exploit the seafloor economically. We don’t even fully understand the resources down there.
But if we did? The ocean breaks down into three main zones:
- Seawater itself
- Beaches and continental shelves
- The deep seafloor
What’s actually in seawater
Seawater is about 3.5% dissolved solids by weight.
The heavy hitters? Chloride. Sodium. Sulfate. Magnesium. Calcium. Potassium. Bromine. Bicarbonate.
It’s not just the open ocean. Inland salt seas like the Dead Sea or the Great Salt Lake pull minerals too.
Magnesium is a big one from seawater. But salts rule the roost.
Table salt (sodium chloride, NaCl) is the king. Then potassium chlorides. Magnesium chlorides. Potassium and magnesium sulfates.
How do they get them out? Evaporation.
Cheap. Simple. Use the Sun.
The perfect salt farm
You can’t just put a pond anywhere and wait for salt. You need specific conditions.
- Hot, dry climate. Dry winds help.
- Land near the sea.
- Soil that doesn’t soak up water. Impervious.
- Flat ground. At or below sea level.
- Little rain during evaporation months.
- No freshwater streams diluting your brine.
- Cheap transport or close markets.
If you hit all those points, you build a pond facility.
What does that look like?
- Impervious base soils and dikes to hold the brine.
- Canals to move brine from source to pond.
- Pumps to lift brine over dikes and land gradients.
- Structures to manage flow between ponds.
It’s engineering meeting weather. No magic. Just physics.
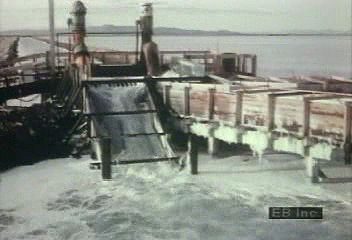
Getting salt from seawater
Modern solar ponds don’t just sit there waiting for magic. They actively pump raw brine into pre-concentration areas. Evaporation does the heavy lifting, pushing sodium chloride levels to saturation. The brine hits 19–21 percent sodium chloride and 28–30 percent total dissolved solids. Then it moves to a crystallization pond.
Time varies. At the Great Salt Lake, you wait about a year. Sodium chloride drops out first. Other dissolved stuff isn’t saturated yet. If you only want table salt, you dump the brine early. Avoid contamination. If you want potassium salts, you keep evaporating. Squeeze every last sodium ion out before your target product saturates.
Once the salt crystallizes on the pond floor, it’s harvest time. Graders, front-end loaders, and haul trucks move the stuff to processing plants. It’s industrial farming for minerals.
Why waste brine is gold
Distillation plants make fresh water from seawater. The leftover effluent is usually a disposal headache. Now it’s a resource. Extracting salts from this waste stream saves money and energy.
Three reasons why. First, the conversion plant pays for pumping. Second, the brine is hot. Warm water evaporates faster. Third, the salt concentration is up to four times higher than in primary seawater. You’re starting with a head start. It makes economic sense to mine the waste.
Heavy minerals on the coast
Beaches aren’t just sand and shells. Micas, feldspars, quartz—they form the bulk. But heavy minerals hide in there too. Columbite, magnetite, ilmenite, rutile, zircon. They resist chemical weathering and mechanical erosion. They stay put while lighter stuff washes away.
Rare finds exist. Gold, diamonds, cassiterite, scheelite, wolframite, monazite, platinum. Minable concentrations are less common but valuable.
Mining above sea level uses conventional surface techniques. Draglines work in the surf zone. Offshore requires different gear. Wire line methods lower buckets on steel cables. Grab buckets, like clamshells or orange peels, bite into sediment. They close, hold the load, and hoist it up. Open the shell at the surface. Dump. Repeat.
Dredges offer a continuous process. Bucket-ladder dredges dig based on bucket size and power. They’ve mined gold, tin, platinum, and diamonds globally. Offshore, they mainly target gold and tin. Hydraulic suction dredges remove overburden. They move unconsolidated sediments with low specific gravity over long distances. You need a steady water supply.
Semiconsolidated sediments need bucket-wheel or cutter suction dredges. Air-lift dredges are surprisingly simple. No submerged moving parts. Compressed air injects into a pipe at 60 percent submergence depth. The fluid column inside loses density. If the pipe top isn’t too high above water, the air-water mixture overflows. Water and sediment rush in to replace it. The capacity for lifting solids is substantial. Simplicity wins.
The deep ocean floor
The ocean basins aren’t flat. Gently rolling hills dominate. Slopes rarely exceed a few degrees. Relief varies by a few hundred meters. Average depth? 3,800 meters. Roughly 12,500 feet.
Two main sediments cover the floor. Calcareous oozes and red clay.
Calcareous oozes come from planktonic organisms. Their shells and skeletons settle. About $10^{16}$ tons cover 130 million square kilometers. That’s 50 million square miles. Close to many coasts. Some deposits are nearly pure calcium carbonate. Others resemble limestone used in Portland cement. Potential building material in the deep.
Red clay covers another 104 million square kilometers. Roughly $10^{16}$ tons. The composition isn’t flashy. But it might hold value. Raw material for clay products. Or a future metal source. Average alumina is 15 percent. Some spots hit 25 percent. Copper reaches 0.20 percent. Nickel and cobalt appear in tiny fractions. Manganese sits around one percent. These metals hide in micronodular fractions of the clay. Screening or physical methods could separate them.
The ocean floor is a warehouse. We’re just learning how to open the doors.
The Real Money Is In The Mud And The Salt
Look closer at that hot brine in the Red Sea. Underneath it sits something far more interesting than thermal vents. Basins of metal-rich sediment. They’re sitting there waiting. The Atlantis II Deep is the big one. Estimates suggest it holds serious grades of copper, zinc, silver, and gold. These pools are about 2,000 meters down. Roughly 6,600 feet. Right between Sudan and the Arabian Peninsula.
Here is the kicker. The sediment is gel-like. Pumping it to the surface might actually be easy. It is forming right now. Under current geochemical conditions. It looks a lot like major ore deposits on land. Just deeper.
But the real heavy hitters are elsewhere. Manganese nodules. Phosphorite is out there too but the manganese nodules are where the economic weight lies. They are concretions of manganese dioxide. Usually about 3 centimeters across. Tiny rocks with massive potential.
Think about the scale. The Pacific Ocean floor alone has an estimated 1.5 trillion tons of these things. They pack tight. Up to 38,600 tons per square kilometer. The chemistry is rich. You get 2.5 percent copper. 2 percent nickel. 0.2 percent cobalt. And 35 percent manganese. Some deposits hit 50 percent manganese. On land, that is high-grade ore. Out here it is just scattered on the floor.
How do you get them up? Two main ideas have merit. The deep-sea drag dredge and the deep-sea hydraulic dredge.
The drag dredge works like a giant vacuum cleaner on a leash. It skims a thin layer from the seafloor. Fills its bucket. Then it goes up. A track on the back of the ship lifts the bucket. The load dumps into a hopper. You can mine 10,000 to 15,000 tons a day. From 6,000 meters down. But it is stop-and-go. Lower the bucket. Raise it. Dump it. That nonproductive time kills the economics. It is too intermittent.
A continuous system is better. Enter the hydraulic dredge. This uses a pump and an air-lift system. A self-propelled collector moves along the bottom. It might use buckets or scrapers or water jets. The trick is the fluid-solids ratio. You have to manage the velocity in the pipe. If the pump is too high or too low the mix fails. It is a delicate balance of physics.
We haven’t done it commercially for manganese yet. It is too expensive. But we have mined diamonds from the seafloor. Remotely operated vehicles (ROVs) and vertical tunnel cutters handle that job. The technology exists. The economics just haven’t caught up.
How Solution Mining Turns Rock Into Liquid
Forget the ocean for a second. Look at the ground. Natural brine wells give us most of the world’s bromine. Lithium. Boron. Plus potash and trona. But we make artificial brines too. We dissolve formations of soluble minerals. Halite. That is rock salt. Potash. Trona. Boron.
This is brine solution mining. Or just solution mining. It is how we get salt without digging a hole and hauling rocks.
It starts with a borehole. Drill down to the top of the salt formation. Case it with steel pipe. Extend the hole to the bottom. Then you pick a configuration. There are four main ways to do it.
The top injection technique is straightforward. You suspend tubing to the bottom of the well. Inject water into the annulus. That is the ring between the inner tube and the casing. The water hits the top of the salt formation. It dissolves the salt right there. The brine is heavier. It sinks. It gets pushed out through the tube. The result is a cavern shaped like a morning glory. Wide at the top. Narrow at the bottom.
Bottom injection flips the script. You inject fresh water through the suspended tube at the bottom. You extract brine through the annulus at the top. The cavern starts pear-shaped. Wide at the bottom. As it grows it becomes barrel-shaped. Keep going and it becomes a morning glory too.
Bottom annular injection is different. Water goes in through the casing annulus near the bottom. Brine comes out through tubing set slightly deeper. This makes a barrel-shaped cavern. Consistent. Predictable.
There is a variation that adds control. Two concentric tubes in the well. Water goes in through the annulus between them. Brine comes out the lower inner tube. But here is the clever part. Inject oil or air through the annulus between the casing and the first tube. Oil and air are lighter than water. They float to the top of the cavern. They form a pad. That pad stops the cavern from growing upward. It forces lateral growth. You get a wide cavern without risking structural issues above. When you are done widening it. You pull the oil or air pad. The cavern grows up. You control the shape. You control the resource.
Caverns that merge create efficiency
Size matters here. You can carve out caverns 100 metres or more in diameter using the techniques mentioned earlier. It works in bedded salt. It works in dome salt. But the real trick isn’t just digging a hole. It’s connecting them.
When adjacent caverns coalesce, production jumps. You stop treating wells as isolated units. Instead, you create a system. One well pushes fluid in. Another pulls it out. It’s a coordinated dance. Usually, you see a five-spot pattern. One injection well sits dead center. Four production wells surround it like satellites.
The brine comes up hot and salty. It heads to a plant. Or maybe a solar pond. There, evaporation does the heavy lifting. The water leaves. The salt stays. Simple physics. Effective chemistry.
How the Frasch process extracts sulfur
Sulfur doesn’t just sit on the surface waiting for you. It’s trapped. Specifically, in the capstone of salt domes. The sulfur lives inside porous or fractured limestone. That limestone is sandwiched between rock layers that are barren, impervious, and insoluble. Nature built a perfect container. The Frasch process is the key to opening it.
This method handles both bedded and salt-dome deposits. But the dome setup is the classic example. Here is how the engineering looks.
You start with a borehole in the caprock. You set a casing. It’s about 200 to 250 mm wide. Roughly 8 to 10 inches. From there, you drill down to the bottom of the limestone-sulfur layer. You set a pipe. 150 mm in diameter. Six inches. This pipe has perforations. Two levels of them.
Inside that 150-mm pipe sits another one. 75 mm wide. Three inches. It goes almost to the bottom. Finally, a tiny 25-mm pipe hangs from the surface inside the 75-mm one. Just one inch wide.
Three pipes. Nested like Russian dolls. Why so many? Because you need separate lanes for different jobs.
Superheated water enters the system. It’s hot. About 170 °C. That’s 340 °F. It flows down the space between the 150-mm and 75-mm pipes. It shoots out of the upper perforations. The heat hits the limestone. The temperature rises. It crosses the melting point of sulfur. 115 °C. 240 °F.
Solid sulfur turns to liquid.
Liquid sulfur is dense. Heavier than water. So it sinks. It pools at the bottom of the formation. Gravity does the work. The molten sulfur flows into the lower perforations of the 150-mm pipe. It enters the 75-mm pipe.
Now it needs to get up. It’s thick. It’s heavy. It won’t climb on its own. You inject compressed air through that tiny 25-mm tube. The air mixes with the sulfur. It reduces the density. Think of it as making the slurry lighter. The mixture bubbles up. The molten sulfur rises to the surface.
It’s brute force thermodynamics. Heat it up. Let it sink. Lighten the load. Pull it up. No digging. No mining. Just pipes and pressure.